Showing posts with label DIY. Show all posts

Friday, January 13, 2012

Wishing for Spring to come..


I'm wishing for Spring to come..
For the past two weeks, it has been beautiful here in South Carolina, in the uppers 70's.
As for today, it is in the 40's, and I'm not liking it.
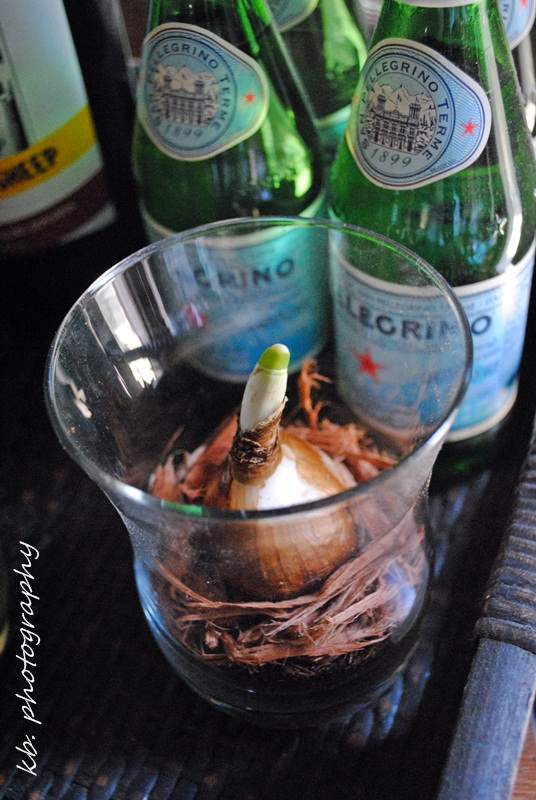
But in my house, it's a different story; I have planted Paper White's, which makes it feel a little bit more like Spring. I rescued these little guys from Target, they were on clearance for $2.98. They were too cute to pass up.. a part of me wishes I would have grabbed some more little guys. I however am not liking the red pot that they came in. It doesn't really go with anything. So I had to think out-of-the-red-pot...
I have a tray that sits on a table near the window, which holds a few bottles of wine, and some mineral water, along with some glasses; which have never been used.
In my head, I thought of something perfect!
"Why not plant the bulbs in the glasses"?
And that's exactly what I did.
Now it definitely feels like Spring in the living room!


Do you have anything growing in your house, bulbs, flowers, plants, even veggies or fruit?
Are you ready for spring to come, or are you enjoying this "sitting by the fireplace, drinking hot cocoa, time of the year"?

Wednesday, January 11, 2012

Beauty Home Remedies


We all love home remedies, am I right?
These are a few that I found to get you through these winter months.
Most of the ingredients for these remedies can be found in your own kitchen.
I'm definitely going to try the Coffee Bean and Cucumber remedy!


 To hydrate dry skin use: Honey
Squeeze a dime-size dollop of honey into palms, blend it with your regular face wash, and use the mixture to give your face a deep facial. For a body wash, use a walnut-size dollop of honey.

Soothe puffy eyes: Chamomile Tea
Steep two chamomile tea bags in warm water, then place in refrigerator to cool. Squeeze excess fluid from tea bags and place over tired eyes for 5 minutes.

Quench parched locks:  Avocado
To make a nutrient-packed hair mask, mash an overripe avocado and mix in an egg yolk and 2 Tbsp. of olive oil. Massage into damp hair, wrap under towel and leave on for 30 minutes. Rinse, shampoo and condition your hair as usual.

Smooth and exfoliate:  Coffee Beans
Dip a wet washcloth into leftover coffee grounds and massage into damp skin from neck down to slough off dead skin. Concentrate on cellulite prone areas like thighs to tighten skin.

Revive tired skin: Cucumber
Puree 1 small cucumber in blender, then add 3 Tbsp. all-purpose flour. Stir until mixture is thick and pasty. Apply to clean, dry face and leave on for 20 minutes. Rinse off with warm water.

As simple as that!


What are some of your special remedies you like to use?
I would love to hear about them!

Thursday, December 15, 2011

Cheap trick for Wrapping Gifts


Instead of using ribbon, why don't you try using Yarn...
It's usually under $2.00,
  you get a lot,
 & let's not forget it comes in a wide range of colors!

Tuesday, November 29, 2011

DIY: Vases & Christmas Ornaments


Hello my beautiful bloggers-
 I have this vase, which holds Lavendar in the bottom of the vase, & a candle in the center.
It was nice; ten years ago...
But now it's time to change that vase up!
So I found some silver vintage Christmas ornaments,
 along with these other silver sparkly ornaments.
I set those in the bottom of the vase.
Then I took the the purple candle out, (which smelt like spring),
and added a simple white one,
 which smells like Peppermint. --- A little more appropriate for the holidays!
And Ta Da!
It looks so much better with vintage bulbs!


 Sooo what do you have planned on this Tuesday?
Me; Well I will be getting down Christmas stuff from the attic! - It's a bit chilly out, so why not start a fire, play some Christmas music, and get to decorating!
I hope you all have a great Tuesday!

Wednesday, October 12, 2011

Before & afters

As most of you know, my boyfriend and I have been looking for a house.
(It's hard work trying to find something we both like). I don't consider myself picky when it comes to the inside of a house, cause everything can be redone. But for the outside.. not so much. The outside is very difficult and quite costly to redo. I have to find a house I like on the outside, at least somewhat. I do not want to pull up to my house and say 'ew' but walk inside and say 'ohh-ahh'. -It's just not happening. I have liked three out of the fifteen we've looked at. But all the ones I like are either too expensive (and wont go down on the price), or they have major problems. All I want is something small; two-three bedrooms, one and a half bathrooms, a living room possibly big enough for a table so we wont have to have a dining room, and a small kitchen, and a laundry room that is not in a creepy ass basement would be really really really nice! I don't care if the walls are hideous panels, or brick, I don't care if there is carpet, I don't even care if the walls are crazy colors, you know why? Cause all that is going to be gone in a matters of weeks! I would love to find a Cape Cod style home, I love that cottage look. I don't mind brick, nor vinyl siding as long as it's done right, but then again I looooove wood homes, and I'm hoping that's what we will end up getting! The right house is out there .. somewhere!
Anyways, I was looking through some old blogs and came across a post I liked. It's before and afters, this is perfect; this is what I want to show my boyfriend. That the inside of a hideous house, can be turned into the inside of a beautiful house! I got these pictures from Young House Love.
Go check out their other before and afters and their new home as well!


What do you think?
This house definitely belong in a magazine!
I hope whatever house we find, turns out looking as great at this one!

Monday, October 3, 2011

DIY Halloween Pumpkin Jar Candle Holders

 Halloween is my all-time favorite holiday!
I love doing creepy, fun, easy crafts for the spooky occasion!
This is the first Halloween / fall craft of the season-
They are called Fright Lights; the idea came from Family Circle Magazine.
In the magazine it says you need all these different materials.. I don't have time to go out and get all the stuff it calls for, so I had to make do with what I had around the house. The one thing I surprisingly had to buy, was black and orange tissue paper, (usually my mum has tons of different colored tissue paper, but for some reason she didn't have those two colors). Thankfully Target has them each (20 sheets for under $1.99).

Anyways, here's the materials I used:
-Black tissue paper
-Orange tissue paper
-Pencil
-Plastic or glass bowl
-Elmer's Glue
-Paint brush or 1" foam brush
-Scissors
-three or more Glass Jars (mason jars, pickle jars, olive jars, sauce jars..etc).
-And some water
-Candles

First Step: Once the jars are clean, you are going to cut Orange tissue paper into 1 1/2 wide strips as long as the jar.
Second Step: Take a glob of Elmer's Glue, and a little bit of water, mix with paintbrush until it's watered down. Brush the glue on to the jar.
Step Three: Add strips of Orange tissue paper onto the jar, overlapping the paper is perfectly fine.
Step Four: Brush glue over the Orange tisse paper; let it dry for a few hours.
Step Five: Once the paper is dry, you can cut out faces or letters that you are going to add on your jar using a pencil and Black tissue paper.
Step Six: Glue on Black tissue paper (faces, letters, etc) on to the jar. Brush the glue on all of the Black tissue paper, let the paper dry, add candles in the jars, and ta da!
. . . . . . . . . . . . . . . . . . . . . . . . . . . . . . .


Thursday, September 1, 2011

DIY: How to make your own Bike Seat Cover

This Labor Day, ride in style!
Make your own bike seat cover by
following these simple steps.

I found this DIY project thanks to  FOSSIL .
I actually have a little story to share with you all.
It started like this... well a few weeks back, I was on a bike high, I pretty much rode every other day for an hour around the neighborhood, hey, it beats jogging! Anyways, one morning I took it out, I was about half way up the street and around the corner.. when my bike seat just completely fell off! There I was, in the road, trying to put it back on, cars driving by, let's just say the ride home was ugh awkward.. I guess I rode that one a little too hard ehh?
Well finally last week I was out, and my mum picked a nice big bike seat out! Did I mention it was her bike seat that I broke... Opps!
But the good thing is now that we have to new seat, we can make a neat seat cover for it!

This is what you'll need:-Bike seat
-Fabric
-Sewing machine or needle & thread
-Scissors
-Elastic
-Tracing paper
-Marker
-Ruler


Step One:
Trace your bike seat on a large sheet of paper. Add 2-inches all around to account for seams and depth. (If your seat appears to be deeper than normal, add another ½ inch or more.) Using the pattern you’ve just created, cut your fabric. 

Step Two:
Place cut-out fabric upside down and fold the edges inward about ½ inch all the way around, pinning as you go. 
Step Three:
Starting at the back, sew around the cover approx. ⅜ inch from the fold. Make sure to leave an opening in the back as you finish – this is for the elastic to be pulled through. 
Step Four:
Thread the elastic through the seam. (We suggest pinning a medium safety pin to the end of the elastic to help push it through.) Once you try it on your seat, tie the elastic so it fits snugly, but is still removable. Trim the ends or add some extra flair by stringing a few beads on the ends. 

Here are a few examples:


Great idea, huh!